Cabinets' support structures are called face frames. They are made of metal or wood and form the drawer and door openings. Glue and clamps are the easiest method of assembly. To hold the pieces together, a strong glue joint was created. Although mechanical fasteners are more effective than clamps, it is important to fill any nail or screw holes prior to installing the face frames. Here are some helpful tips for assembling your face frames.
Cabinet fronts are strengthened by face frames
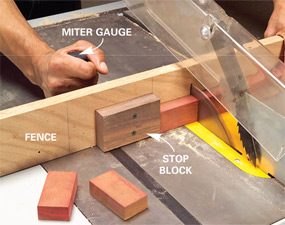
To make your cabinets look more professional, you can add a face frame. You can use them to line up cabinets in rooms that aren't perfectly square. Make sure your face frames are about 1/2 inch smaller than the cabinet size. If you need to square up the cabinets, you can use gapping. Once you have determined the dimensions of the face frame pieces you need, order them and cut them on a tablesaw. While you're cutting the pieces, be sure to make accurate cuts so they look good. Once everything is cut and assembled attach the bottom shelf by using 1-1/4" pockets holes screws.
They make drawer and door openings
Openings are created in doors, drawers, cabinets and cabinets by face frames. They are made typically of wood and metal and can be glued to or screwed into position. You can use glue and clamps to join the frames. A strong, permanent attachment can be achieved by gluing the joints tightly. If clamps are too difficult to use, you can use mechanical fasteners. You must make sure that you fill all the screw and nail holes.
They can either be made of metal or wood
A faceframe is a frame that is constructed with both vertical and horizontal parts. It is placed on the front side of the case. It consists of rails as well as inner and outer stiles. The wood glue used to attach the frame and carcass is wood brads. A frame should be secured with wood glue while it dries. You can use wood brads to attach the frame to any void. If you want them to be invisible, it is a good idea to use wood putty.
They can be made of various widths
The cabinet's appearance is determined by its face frame. You can make a frame in any width you like, from 3/4" to 2". Face frames are usually made from one-inch thick wood and assembled with a pocket screw joint. You have the option to choose between square or beaded frames. You can also choose the size and number openings. A Customer Service Specialist can help you make the right decision about the different options for your cabinet.
They can be attached with PVA glue or pockethole joinery to a box.
Both PVA glue and Kreg's pocket hole joinery are effective ways to attach face frames to a case. You can conceal both methods by using 3/8 inch dowels or plugs for attaching the frame to your case. To achieve best results, choose wood with a contrasting species. Do not paint the frame before you install the face frames. For a more long-lasting alternative, you could use melamine coated particleboard.
FAQ
Where can I locate free woodworking plans
Free woodworking plans are available online. You don't even need to buy books or magazines. You just need to search Google. Enter "free woodworking", and you will see hundreds upon hundreds of websites offering free plans.
Where can I find my woodworking tools?
There are many places that you can find all the information you need. You could also visit hardware stores in your area or shop online at Amazon.com.
You can also look for used furniture at flea markets or garage sales.
How much should a woodworker charge per hour?
The hourly rate of a professional woodworker depends on many factors including experience, skill level, availability, location, etc.
The average hourly rate for a skilled woodworker ranges from $20-$50 an hour.
A less experienced woodworker may charge as little as $10 an hour.
How do you calculate woodworking costs?
It is crucial to keep project costs as low-cost as possible. You should always try to make sure that you are getting the best deal on materials. You should also consider other factors that could impact the cost of your project, such as experience, skill level, time, and money. If you want to get an idea of what you can expect to spend on different types of woodwork projects, check out our guide to the average price of common household DIY tasks.
What type of wood should I choose?
The most commonly used woods for woodworking are oak, maple, cherry. Each type of wood has its own unique characteristics that can affect the final product's appearance. Oak, for instance, is darker and harder than most other woods. Birch is soft and lightweight, while mahogany is denser and heavier. You can also choose between solid wood and veneers. Veneers consist of thin sheets made from wood and glued together to form a single layer.
Statistics
- In 2014, there were just over 237,000 jobs for all woodworkers, with other wood product manufacturing employing 23 percent; wood kitchen cabinets and countertop manufacturing employing 21 percent. (theartcareerproject.com)
- Most woodworkers agree that lumber moisture needs to be under 10% for building furniture. (woodandshop.com)
- Average lumber prices rose about 600 percent between April 2020 and May 2021. (familyhandyman.com)
- The U.S. Bureau of Labor Statistics (BLS) estimates that the number of jobs for woodworkers will decline by 4% between 2019 and 2029. (indeed.com)
External Links
How To
How to join wood without using nails
Woodworking is a hobby that many people enjoy doing. It's fun and relaxing because you can use your hands to make something useful from wood. However, there are times when you want to join two pieces of wood together without having to use nails. This article will teach you how to do this to keep your woodwork projects looking great.
The first thing you'll need to do is cut off any rough edges from your pieces of wood before joining them together. Do not leave any sharp corners as they could cause problems down in the future. Now it's time to start glueing your boards together.
If you're working with hardwood, you should only apply glue to one side. For softwoods like cedar and pine, glue should be applied to both sides. Apply the glue to the boards and press them down until they are securely attached. Before you proceed to the next step, be sure to let the glue dry completely.
Once you've glued your boards together you will need to drill holes in the joints to accommodate screws. Depending on what type screw you choose, the size of these holes will depend on how big they are. For example, if you intend to use 1/2-inch wood screws, you need to drill a hole that is at most 3/4 inches deep.
Once you've drilled your holes, you'll want to drive the screws through the joint and into the backside of the board. Do not hit the boards' front surfaces. It will ruin the finish. Avoid hitting the screws' ends too often when driving screws. This will prevent splitting in the end grain of the wood.
Now that your project is finished, you'll want to protect it from the elements. You can either seal the entire piece of furniture or cover the top. You want it to last years, so you can use any product. There are many options: oil-based varnishes; polyurethane; shellac; lacquer.
These products can generally be found in any home improvement shop. You should make sure you are getting the right type for the job. Remember that some finishes can be toxic, so you should not use them indoors. Always wear protective gear when handling any of these finishes.