Sharp edges in wood carving tools enhance your pleasure of carving. These are some common methods for sharpening wood carving tools. Sharper edges last longer and are more durable than dull ones. Sharp edges will also make it easier to use your tool more efficiently. Sharp edges are easier to carve and provide the best cutting performance. Below are three ways to sharpen wood carving tools. Continue reading to learn more. - How to use a sharpening tool.
Sharp edges increase carving pleasure
Sharp tools will not only make carving easier, but sharp edges are essential. Sharper tools require less effort, and are easier to control during carving. A sharply-cut blade has a smoother surface that leaves a silky-smooth cut. A successful carving project requires sharp tools. For optimum results, hone your carving tools regularly. Regular sharpening will keep the tools sharp and makes carving easier.
Sharp edges can increase the pleasure of carving but they can also cause blisters. Wood's natural texture is rough, and regular handling will toughen the skin on the hands. Although blisters will eventually turn into calluses, this can be painful and time-consuming. If you notice blisters in your carving, try to change the way you hold your tools. Although it may be difficult to master, it will be worth the effort.
When sharpening your knives, begin by using a sharpening kit and a fine-grained stone. Check for any damage to the edge. Chips around the edge will require more intensive grinding. A dull edge may only require minimal grinding using a finer stone. Finally, you can test the knife with a piece of paper or rope. A sharpening stone may not be necessary if the knife is dulled for a while.
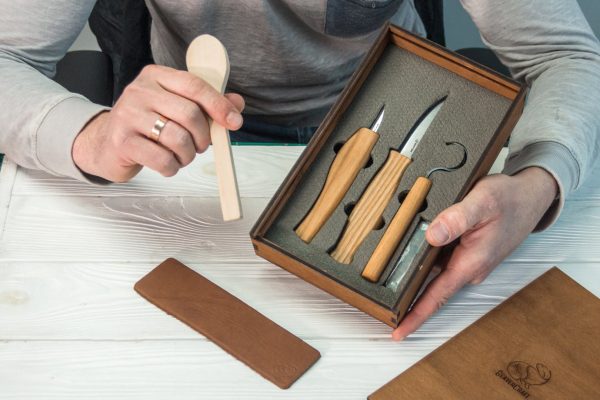
Common techniques for sharpening wood carving tool
There are many options for sharpening wood carving instruments. There are several options for sharpening wood carving tools. Oil stones require oil to apply to the stone's exterior to prevent metal particle embedding in the surface. Diamond and ceramic stones are oil-free and can be used to sharpen carbide wood carving tools. This article will cover the most common methods of sharpening wood carving instruments.

To remove the wire edge from a knife blade and to polish it, leather strops are useful. A leather strop can be used for any tool, but some carvers prefer a texture one. Flat leather strops work well for straight tools as well as the outside edges of gouges. For those who take their work seriously, a leather strop that has grooves may be a good investment.
Bench chisels have been sharpened traditionally at a 25-degree angle, with a secondary bevel of 5 degrees. Modern alloys won't work well with these angles and can even cause them to corrode. This means that you will need to raise your bevel angle. This will mean that you need to use more force and have less control. The same goes for block planes. They are often sharpened at an angle of 20 degrees.
Using a sharpening stone
Sharpening stones can be used to make wood carving tools more precise. The stone's crystalline form contains grit. This mineral is hardier than steel and has sharp edges. The stone will require a lubricant to aid in cutting and prevent metal particles getting stuck. It will be much easier to cut wood with little resistance once you have sharpened the edge. The strop (often made of leather) is used to polish the edge, remove burr, and clean up the edges.

There are many types and brands of sharpening tools on the market. There are oilstones that can be used for sharpening, waterstones and ceramic stones. The oil stones use oil as a lubricant to avoid fine metal particles from burying themselves in the stone surface. The lubricants that are needed for ceramic and diamond stones are not required. They are both effective in sharpening carbide wood carving tools.
The Sentima sharpening stone is a great example of a quality sharpening system. It has both a coarse stone and a fine stone made from corundum. This material has consistent grain, which helps it provide fast cutting action and a smooth finish. Its unique design is easy to clean. The sharpening tool is made of durable materials so it can last for many years.
FAQ
How do I learn basic woodworking skills?
A great way to start learning how to build furniture is by building a simple bench for yourself. This project can easily be done using whatever wood you have at your house. If you aren't sure what type of wood to use, you can buy cheap pine boards from Lowes or Home Depot. Once you have built your bench, you will need to sand it off and then finish it with a stain/varnish.
How long does a piece take to finish?
It depends on which wood you choose, how complicated your design is and what amount of finishing you apply. Hardwoods, on the other hand, are more durable than softwoods. Hardwoods are also more expensive than softwoods. But they last longer, and resist moisture better. The process of finishing a piece of furniture typically takes anywhere from one week to three months.
How much will it cost to get started?
Because each project is unique there are no exact numbers. Consider these factors if you need to estimate the amount of money that you will require.
-
Cost of materials
-
Tools and equipment
-
Time spent working on the project
-
Your hourly rate
-
What profit are you expecting to earn?
-
No matter if you are looking to hire someone
For those just beginning, it may be a good idea to start small with simple items like boxes and picture frames. You will gain more experience and be able to tackle larger projects.
What time does it take for furniture to be finished?
It all depends on how large the furniture is. You can finish smaller projects, such as boxes or picture frames, in one day. Larger projects like dining tables and desks require several days. It takes time to properly stain and seal wood.
How can you calculate the woodworking price?
The most important thing to remember when calculating costs for any project is to keep them as low as possible. Make sure you're getting the best prices on materials. Also, consider all other factors that can affect the price of your projects such as skill level, experience, time and cost. Our guide to the average household DIY task price will give you an idea of how much it costs to complete different types of woodwork projects.
Are you looking for tips to start a woodworking company?
Starting a woodworking business is a lot of work. But if you're passionate about your hobby, you won't mind putting in the effort. You'll enjoy the challenge and rewards of owning your own business.
When you are launching a new venture, it is important to be aware of the possibility that you will encounter unexpected difficulties. You might run out money, or you may have to borrow unexpectedly. You might find customers not willing to pay the amount you expected. To survive, you'll need to be prepared for such situations.
A good tip is to open a separate bank account for your business. You'll know exactly how much money is coming in by setting up a separate bank account.
Which material would you recommend for woodworking lessons?
You can start with softwoods like pine or poplar. Once you feel comfortable with these two, move on to hardwood.
Statistics
- The best-paid 10 percent make $76,000, while the lowest-paid 10 percent make $34,000. (zippia.com)
- Most woodworkers agree that lumber moisture needs to be under 10% for building furniture. (woodandshop.com)
- In 2014, there were just over 237,000 jobs for all woodworkers, with other wood product manufacturing employing 23 percent; wood kitchen cabinets and countertop manufacturing employing 21 percent. (theartcareerproject.com)
- Woodworkers on the lower end of that spectrum, the bottom 10% to be exact, make roughly $24,000 a year, while the top 10% makes $108,000. (zippia.com)
External Links
How To
How to make wood joints
This tutorial will show you how to join two pieces of wood together. We will use the pocket hole joint, which is drilling holes in the wood to join them. If your wood has a straight grain, smooth surface, you can use this method. If your wood isn't straight or flat, you might want to try another method, such as dowel joinery. These are the steps
-
Drill Pocket Hole Joints. Start by measuring and marking the spot where the pocket hole joint will be placed. Next, drill 3/4 inch holes in each end of each piece using a handheld drilling machine or jigsaw.
-
Sand Smooth. Sanding the wood's edges will ensure that the joint doesn't split.
-
Glue the two sides of the wood together. Apply glue to both ends of the wood. Allow the wood to rest for five minutes before clamping it together.
-
Attach the Pieces together. After the glue has dried properly, clamp the pieces together to make sure they are flush.
-
Trim Joinery. Trim the excess wood around the joint after the glue has dried completely.
Allow enough space between pieces so you can turn them inside out.