
How does the sanding scrollsaw work? These are some helpful tips to use a scrollsaw properly. Make sure your hands are in the right places, hold the wood on your table, plan your cuts and sit at the right height. Use the correct tool for the job. To help you get started, we have included a video. Follow these steps to get started. Hopefully, this video will help you become a scroll saw master!
Setting the speed required to sand scroll saws
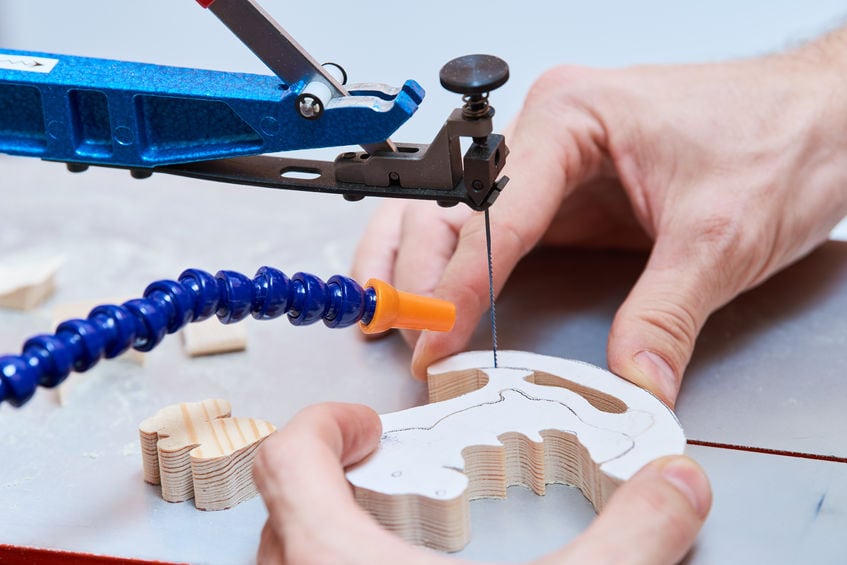
Set up your scroll saw blade and blower. Depending upon the type of cut that you are making, the blower should point at the blade. Preparing your scrollsaw also involves making sure that the belt fits snugly and that you have lubrication. This is crucial for sanding. You can also adjust your blade to achieve the desired finish.
First, examine your blade to find the speed you need for sanding. A well-balanced blade won't vibrate as much. It should be a sharp, narrow, black line. If it appears blurred, the blade is out of whack. The scroll saw should be run at a slower speed if the blade isn't cutting the material correctly.
Making on-the-spot turns with a scroll saw
Although a scroll saw gives you unparalleled control over cutting, it is important to remember several safety precautions. Before using the scroll saw, first ensure it is dry. Next, take a look at the grain patterns. Tape can also be used to hold the blade straight. After you're done cutting, take off the tape and sand your edges. After you are done, spray lacquer. You should be aware that scroll saws can prove to be dangerous tools. Follow these safety precautions.
Once you've decided what to cut with a scroll saw, you'll need a pattern. To prevent the blade's veering off the lines, you will need to leave enough "positive" space. Start by marking the pattern with pencil. After you have completed your pattern, make sure to put on the correct gear. You can then guide your project through the scrollsaw. Make sure you use the smallest blade possible, but don't veer off.
Using a pinless sander to sand a scroll saw

A scroll saw can be used with a pinless sander. You can easily smoothen the edge with most scroll saws by changing the belt. This belt will fit most scroll saws with a 5-inch diameter. The belt can be used for removing burns or correcting a wandering line of cutting. Belts can be purchased with different grits depending on the requirements of your scroll-saw.
Pinless sanders can be used with all scroll saws and conversion adapters. They fit on the blade like a Plain End, Pinned or Pinched blade. To use one, simply cut off the pivot head. Install the conversion adapter to convert a Pin-End from a Pinless sander and replace the blade.
Use a sanding wheel to sand the scroll saw
Using a sanding belt on your scroll saw can greatly improve the smoothness of the edges of your woodworking projects. These belts, which are made of durable plastic, can be attached to most models of scrollsaws with pin ends. These belts work best on larger woodworking projects such a table, countertop, or cabinets. These belts come in either 1/4"- or 1/2" widths. They are also available in 80, 120, 180, and 220 grits.
A quality sanding cloth will smoothen the edges on your scroll saw. It can also be used on a variety materials. You can choose the best belt for you scroll saw by using a variety of grits. A good gritbelt should be at minimum half an inches wide. It should be compatible to most scroll saws, which take a blade of 5 inches.
FAQ
Can I make my living doing this job?
Yes! Many woodworkers have this ability. According to the U.S. Bureau of Labor Statistics in May 2012, the median annual income for woodworkers was $34,000 This is significantly higher than the national average, which is $31,000 per year.
Can you teach yourself woodworking?
You can learn everything best by doing. Woodworking takes practice, skill, patience and experience. It takes time to master any craft.
To actually learn something is the best way. So start small and build on what you have learned from there.
Where to buy Hardwood Lumber
Home Depot sells hardwood lumber. They offer a wide range of wood products including flooring, cabinets, furniture and more.
You can also find a large selection of engineered hardwoods like Ipe (Araucaria Angustifolia), Brazilian Cherry, and Mahogany in their collection (Swietenia Macedonilla).
These woods can be found online by searching for "hardwood lumber" in Google.
Is it difficult to start my woodworking business?
It's not easy to start your own woodworking business. There are many regulations and legal requirements that you will need to comply with. This doesn't necessarily mean that you should go through all the work of setting up a company. Many people join already-established businesses. You will only have to pay membership fees, taxes, and other charges.
What tools are used by carpenters?
A hammer is probably the most widely used tool for carpenters. A hammer is used for pounding nails into wood. A hammer is used to hold pieces together during a project. Other tools include clamps and pliers, screwdrivers as well as measuring tape, pencils and saws.
How can a beginner woodworker make money?
Many people learn how to make furniture in order to set up an online business. If you are just starting to build furniture, there are many other ways to make money than selling on Etsy. You can sell at local craft fairs. You could also offer workshops to help others learn how to make their own furniture. If you have the experience to be a carpenter, builder, or a designer, you may consider offering your services in remodeling homes or creating custom pieces.
Statistics
- If your lumber isn't as dry as you would like when you purchase it (over 22% in Glen Huey's opinion…probably over 10-15% in my opinion), then it's a good idea to let it acclimate to your workshop for a couple of weeks. (woodandshop.com)
- Woodworkers on the lower end of that spectrum, the bottom 10% to be exact, make roughly $24,000 a year, while the top 10% makes $108,000. (zippia.com)
- The U.S. Bureau of Labor Statistics (BLS) estimates that the number of jobs for woodworkers will decline by 4% between 2019 and 2029. (indeed.com)
- In 2014, there were just over 237,000 jobs for all woodworkers, with other wood product manufacturing employing 23 percent; wood kitchen cabinets and countertop manufacturing employing 21 percent. (theartcareerproject.com)
External Links
How To
How to join wooden boards without using nails
Woodworking is a favorite hobby. It is relaxing and enjoyable because you can create something useful with wood. Sometimes you may want to join two pieces together of wood without using nails. This article will show you how to do it to make your woodwork projects look great.
You will first need to trim the edges of your wood pieces before joining them. You don't want to leave sharp corners that could cause problems later on down the road. Now you can start gluing the boards together.
When working with hardwood, glue should be applied only to one side. You should glue both sides if you are working with softwoods such as pine and cedar. Press the boards down until the glue is fully incorporated. Before moving onto the next step, make sure the glue has dried completely.
After you've glued your boards, you'll want to drill holes into the joints where you plan to insert screws. These holes will differ depending on the type and size of screw you are using. If you plan to use a 1/2 inch wood screw, drill a hole at least 3/4 inches in depth.
Once you have drilled the holes, the next step is to drive your screws through the joint into the board's backside. Do not hit the boards' front surfaces. It will ruin the finish. Try to not hit the ends of the screws when driving the screws. This will avoid splitting in the wood's ends grain.
Protect your finished project now. You can either cover the entire furniture or just the top. Either way, you'll want to use a product that will last for years to come. There are many options: oil-based varnishes; polyurethane; shellac; lacquer.
These products are available at most home improvement stores. Be sure to choose the right one for your project. Also, remember that some finishes are toxic and should never be used indoors. Protective gear should always be worn when handling these finishes.